All of the Windows 10 users should know that there is a service exists on your operating system that continuously collects your usage and performance data and sends it to Microsoft. All over it is a very safe and secure process.
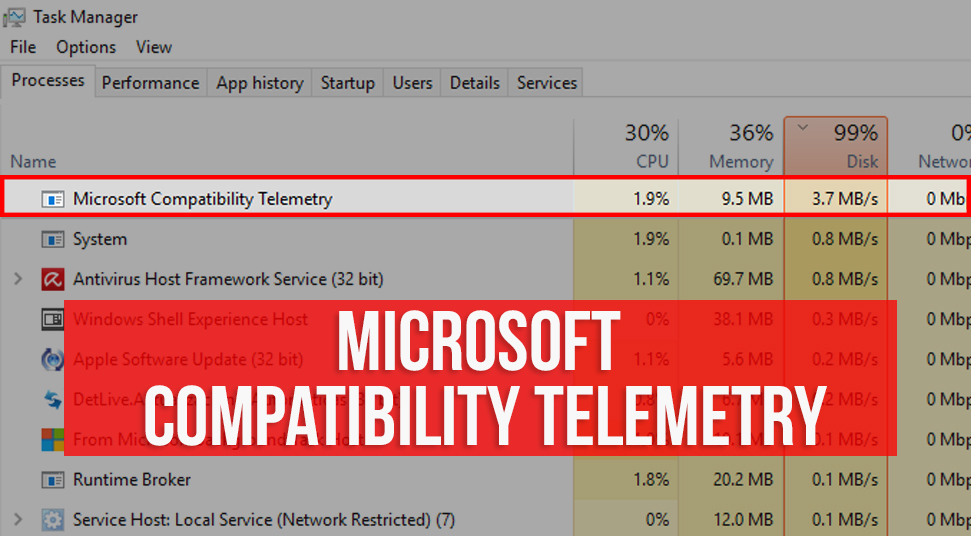
But according to some reports, many Windows 10 operating system users have experienced Microsoft Compatibility Telemetry high disk usage. And many thought that this is a matter of safety and security.
Now if you are one of these users and also have encountered the Microsoft Compatibility Telemetry High Disk usage problem then you are reading the most appropriate article. As today here in this topic, we will discuss some methods on how to disable Microsoft compatibility telemetry.
Before going straight into that section let us first discuss some more points on Microsoft Compatibility Telemetry.
What is Microsoft Compatibility Telemetry?
The Microsoft Compatibility Telemetry or in technical words can be said as CompatTelRunner.exe is a Microsoft Compatibility Appraiser. All this does is collects your usage and performance data on your Windows 10 operating system and sends it to Microsoft.
Microsoft provides this service to every user using Windows operating system. By this service, Microsoft keeps the user experience enhanced and much more appealing by fixing all the major potential and compatibility issues.
But on the other hand, in order to scan all the files and applications on your operating system, the Microsoft Compatibility Telemetry consumes a lot of your CPU memory. This is the reason, many Windows 10 operating system users have experienced the Microsoft Compatibility Telemetry High Disk usage issue on their Windows operating system.
So the file that provides this service has resided in the C:\\Windows\System32 folder of the C drive of your system. The file is read-only in nature, which means you cannot modify the file or remove it.
Hence, in order to bypass this kind of files, you need to get the ownership of the file.
How to Disable Microsoft Compatibility Telemetry?
Now that you know that what the Microsoft Compatibility Telemetry is and what does Microsoft Compatibility Telemetry do. Hence now we can discuss the reasons why you should disable the Microsoft Compatibility Telemetry in order to avoid the high disk usage issue.
As mentioned earlier, the Microsoft Compatibility Telemetry consumes a lot of your CPU memory, hence this causes some major issues on your Windows 10 operating system, such as random shutdowns, crashing of programs and you might experience a slowed down OS.
Moreover, apart from these issues, many users are also concerned about their privacy and security. Many users do not want to get tracked at all. Therefore, as per to avoid any kind of security risks, it is always recommended that you disable the Microsoft Compatibility Telemetry on your Windows 10 Operating system.
Therefore in the below section, we are mentioning some best methods by applying which anyone can easily disable the Microsoft Compatibility Telemetry from your Windows 10 operating system.
Methods to Disable The Microsoft Compatibility Telemetry
Now that you are here in this section, that means you have also encountered this issue on your system and want to disable it. So all you have to do is follow the below methods and you will be good to go.
Method 1: Disable Microsoft Compatibility Telemetry Using CMD
You can easily disable the Microsoft Compatibility Telemetry from the command prompt of your Windows 10 operating system. To carry out the procedure, just follow the below steps.
- Open your system and press the Window key and the “R” key from your keyboard together to open the command prompt window.
- In the blank box of the command prompt window type in “cmd”.
- Now as we want to run the cmd command as an administrator, so instead of pressing enter, press CTRL+SHIFT+ENTER at the same time.
- A black command window will open on your screen. To continue just type in the below command in the command window.
sc delete DiagTrack sc delete dmwappushservice echo “” >
C:\\ProgramData\\Microsoft\\Diagnosis\\ETLLogs\\AutoLogger\\AutoLogger-Diagtrack-Listener.etl reg add
“HKLM\\SOFTWARE\\Policies\\Microsoft\\Windows\\DataCollection” /v AllowTelemetry /t REG_DWORD /d 0 /f
Once you are done with the above steps, now you have successfully disabled the Microsoft Compatibility Telemetry from your Windows 10 operating system.
Method 2: Disable Microsoft Compatibility Telemetry by Deleting The “CompaTellRunner.exe” As an Administrator
In case the above method does not work for your case and you are still stuck with the same issue. Then you can just disable the Microsoft Compatibility Telemetry by deleting the “CompaTellRunner.exe” from your Windows 10 operating system.
But in order to delete this executable file, you have to log in to your system as the administrator. So just follow the below steps and you will be good to go.
- First, open your Windows 10 operating system and login as an administrator.
- Once you are in the desktop press the Windows key and the R key together.
- By doing this the command prompt box will open on your screen.
- On the blank field type in C:\Windows\System32 and then press Enter.
- A file directory will open on your display. Here you will find all the system files installed on your computer.
- On this window only, press CTRL+F and in the search bar type in “CompatTellRunner” and press enter.
- Now right click on the highlighted option and click on the properties.
- From the properties, the dialogue box selects the Security tab from the top and click on it.
- Once you are inside the security tab scroll down to the bottom of the window and click on advanced settings option.
- Upon clicking on the advanced settings option, a new window will appear on your screen. From this Window locate the Owner tab placed on the top and click on it.
- Another new window will open on your screen. Here navigate to the Edit option.
- Once you are inside the edit window select the administrator option and click apply. Then save all the changes you have made in the above step.
Here at this point, a pop window might open on your screen asking to close all the properties Windows. Click on the Okay option to proceed further. Now successfully you are the owner of the file.
So now if you want you can easily delete this file from your operating system. But before doing that you need to change the permissions of the file. Hence as per to do that just continue to follow the steps.
- Go the previous step number four. Now right click on the CompaTellRunner.exe and click on the properties option.
- Now from the properties section go to the advanced settings option. S
- After that select the permissions tab and in the next window choose the administrator account.
- Once you are here, click on the Allow column and from here you will be able to control all the permissions.
Then again go to the file directory of the file and delete the CompaTellRunner.exe from your Windows 10 operating system. Once you have finally completed all the above steps, the Microsoft Compatibility Telemetry will get disabled from your system.
In case if you see that the Microsoft Compatibility Telemetry high disk usage problem still persists on your Windows 10 operating system then you can just move on to the next method.
Method 3: Disable Compatteltunner.exe from Task Scheduler
This is another way by you can easily disable the Microsoft Compatibility Telemetry from your Window 10 operating system. That is by disabling the Compatteltunner.exe from your system.
All you need to do to carry out this procedure is to follow the below steps.
- Open your system and while you are on the desktop press the Windows Key and the R key altogether.
- By doing that a command prompt dialogue box will appear on your screen.
- In the blank field type in taskschd, MSC and then hit the enter key.
- Upon hitting enter the task scheduler window will open on your display. From this window click on the Task Scheduler Library tab placed at the top.
- Now from here, you will see the Microsft folder. Click on that file and then click on the Windows folder and expand the folder window.
- Once you are here, now locate the Application Experience folder and click on it. It will open a window with a list of tasks.
- From this list locate the task that says, “Microsoft Compatibility Appraiser”. After you have found that option, right-click and then select the disable option.
Once you are done with all the steps mentioned above the compatibility telemetry will get automatically disabled on your Windows operating system. It is always recommended that after you are done with all the steps, you should restart your system in order to make the changes in effect.
Finally…
Here, we can conclude that there are a lot of ways by which you can easily disable the Microsoft Compatibility Telemetry high disk usage problem. In the above article, we have discussed in detail how to disable the Microsoft Compatibility Telemetry from your Windows 10 operating system.
So if you are still stuck with the same issue and now facing several consequences of the issue, then just follow the above topic and you will be able to get yourself out of the problem.